POINT-TO-SITE VPN CONNECTION

#Requirements:
1)Create
a client on the on-prem with Windows 10 pro ISO file.
2)Create
a VM server on Azure with the same ISO file of Windows 2016 Server within a
resource group in Azure.
3)Connections:
Virtual Network (Azure), Subnet Gateway (Azure), (VNG)Virtual Network Gateway
(Azure), Self-Signed Root Certificate (SSRC) (On-prem), Client Certificate (CC)
(On-prem), VPN Client (On-prem).
#Steps:
1)Create
a client on the on-prem with Windows 10 pro ISO file.
2)Create
a VM server on Azure with Windows 2016 Server ISO file within a resource group
on Azure (You might use any region while creating the VM but make sure it
should be same while creating the VNG).
3)Make
sure that after starting the client and the server match their time zones for
sync purpose.
4)While
creating the VM on Azure the system will automatically create a virtual network
on Azure for the VM and it will automatically create and assign a subnet to the
VM
5)Now we
create the VNG on Azure by providing it a name on Azure UI on the website then
select the resource group then it will automatically create a gateway subnet
and assign it to the VNG, also create a Public IP for the VNG within the
process of creating the VNG. (It will take around 25 minutes for creation)
6)Now we
1st create the SSRC and the CC on the client machine on the on-prem,
for that open google then search for “point to site certificate azure” then
click on the 1st link

Now in
that page search for “CREATE A SELF-SIGNED ROOT CERTIFICATE” then copy the
PowerShell command below

Now open
PowerShell as administrator and paste the command and run

Now in that same page search for “GENERATE A
CLIENT CERTIFICATE” then copy the PowerShell command below

Now open
PowerShell as administrator and paste the command and run

7)Create a empty folder on Desktop and name it
as ‘Certificate’
Now press ‘Windows + R’ and type ‘certmgr.msc’
then go in

Then follow the steps below


Then select the ‘Certificate’ folder and save
it by giving it a name

Then click on FINISH
8)Now again press ‘Windows + R’ and type
‘certmgr.msc’ then go in

Then follow the steps below


Then select PASSWORD checkbox and enter a password like ‘abc123’
Then select the ‘Certificate’ folder and save
it by giving it a name

Then click on FINISH
Now open the ‘Certificate’ folder and double
click on the client certificate

Then follow the steps below

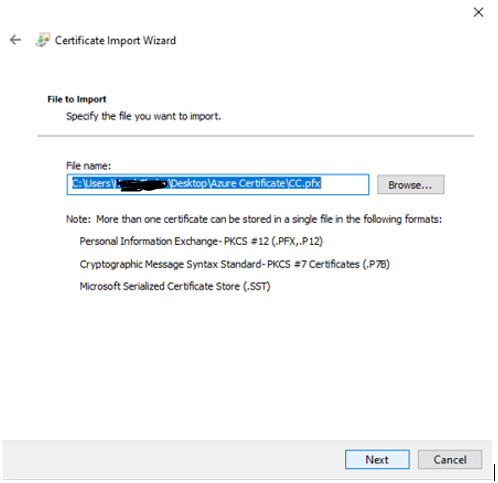
Here enter the password that you have set
before the ‘abc123’ one and then check the 2nd unchecked box in the menu


Then click on FINISH and then click on YES
9)After
the creation of VNG open it and click on

Then
click on CONFIGURE NOW

Then
enter the ADDRESS POOL (example: 192.168.1.0/24) then provide it a NAME then
select the Authentication type to Azure certificate then in the ROOT
CERTIFICATE part 1st provide it a NAME then open the .cer file in
notepad stored in the ‘Certificate’ folder,

Then
copy this

In the
PUBLIC CERIFICATE DATA and click on SAVE.
10)Now click on DOWNLOAD VPN CLIENT to install
the VPN Client.

Then after the download unzip the zip file
downloaded and select a suitable version for your OS and double click on it to
install.


Once it installed click on your network
settings bottom right corner and then click on VPN
Then click on CONNECT

Then again click on CONNECT

Then click on CONTINUE

Now you can easily take remote access to the Azure
VM through its private IP rather that its public IP.
11)Now press ‘Windows + R’ and type mstsc and
enter the private IP of the Azure VM then enter the credentials and now you can
easily get the remote access.
